
Developing the user interface |

|

|

|

|
||
|
Developing the user interface |

|

|

|

|

|
Developing the user interface
|
|
||
User interface metadata
An abstract User Interface (UI) module is described by a set of metadata objects generated by the Persistate Generator application. There are several classes of these metadata objects, as follows.
| ▪ | The Workspace class is made up of a hierarchy of Pane objects to describe the overall arrangement of an IPWindow. |
| ▪ | The Layout class describes a way of portraying objects of a particular class (ObjectClass or ViewClass) and contains a number of Placement objects, each of which portrays one Member of the class using a particular Format. |
| ▪ | The LayoutType struct determines one of various types of Layout, such as Form, Grid, Lookup, etc. |
Workspaces and Panes
A Workspace describes a top level user interface window (IPWindow) in terms of the Pane objects contained in it and how they are arranged. The Example Definition File shows a very simple workspace for the Library application. You define the Pane hierarchy by declaring a Pane to be split into two or three contained Panes, arranged horizontally or vertically, each of which can be further split, and so on.
As well as split Panes, you can also define sets of tabbed Panes, which all occupy the same space, but can be selected using a set of protruding tabs. In addition to defining the physical arrangement of Panes, you can define their default content, in terms of the class and LayoutType (see below) of objects they are meant for. See Workspace Definition for full details.
Workspaces are designed to be dynamic. Definitions in the definition file are a starting point, but users and developers can change the map at run-time. Panes can be split and combined if the splittable modifier is used, and tabs can be created and closed. Resultant Workspaces can be saved and reinstated.
Workspaces are easy to display. You can create an IPWindow initialised with a particular Workspace with a simple method call to the UserInterface abstract class. Any number of IPWindows can be displayed in an application session. The Workspace can be either a defined one, or a dynamic one which has previously been saved by the user or your code. See Accessing the user interface for details.
Layouts, Placements and Formats
A Layout object describes how a particular class of object (ObjectClass or ViewClass) is portrayed. Layouts are comprised of a number of Placement objects, one for each Member of the class. Each Placement places its class Member at a particular place in the Layout, using a particular Format.
The Formats you can use depend on the type of the Member. An integer Member can be shown for example in a text box, or a spinner. A collection Member can be shown for example as a sub-grid (a grid displayed alongside the other Placements) or as a button which will display the collection using another Layout when clicked.
|
For the moment, Persistate provides a fixed set of Formats, and a single type of UI - the Desktop UI. This is really intended as a demonstrator, although it is fully usable. On or before version 1.0 of Persistate, there will be other types of UI available, a larger selection of Formats, and a facility for developers to provide plug-in Formats to supplement those provided by Persistate. |
Once you have displayed an IPWindow initialised with a Workspace, you can then display persistent objects or collections in named Panes in the Workspace using particular Layouts. You can also show an object or collection in a modal dialogue box using the same Layouts. Both of these actions are achieved with a simple method call to the UserInterface abstract class.
Layout Types
There are a number of different types of Layout. Persistate generates default Layouts of an appropriate type given the way in which the classes are defined. For example, if a class is used in a collection of many objects, a Lookup will be created for that class. If it is used in a collection of several objects, a Grid will be generated.
| • | A Form Layout is bound to a single object, and shows the individual members of that object. Although the form Layout is bound to a single object, a collection member of the bound object can be shown in a sub-grid Format within the form, and a single object members can be shown in a sub-form Format. These Formats are used alongside a sub Layouts. |
| • | A Grid Layout is bound to a collection of several objects, and shows the elements of the collection in a table, one per row, with the object members in columns. |
| • | A Lookup Layout is bound to a collection of many objects and allows the user to lookup subsets of the collection. It shows entry fields for any discriminative (this includes nominative and distinctive) members of the collection class. It also has a search button and a sub-grid showing the results. |
| • | A Tree Layout is bound to a single object, usually a singleton, and shows the persistent tree under that object as an explorer style expandable tree. Clicking nodes can display the object or collection at that node in another Pane. |
| • | A Control Layout is bound to a single object and shows menus and/or toolbars bound to the operations defined for that object. Its can also show Persistate standard operations, or operations bound to objects in the tree under the bound object. |
Creating Workspaces
There are two ways to create Workspaces. The first way is to define them in the definition file. When you process the definition file using Persistate Generator, any Workspaces defined in it are created, and stored in the Package.Workspaces collection. The Workspace Definition section describes how to create Workspaces in the definition file.
The Workspaces created in this way are fixed, but you can examine using Persistate Generator or Persistate Configurator by expanding nodes in the left hand navigation pane until you get to the package you want, clicking the package node to display the Package Form, and then clicking the Workspaces button.
The other way to create a Workspace is at run time. A user can do this by executing the Save Workspace operation. The Customising the workspace section describes how to do this for the Generator and Configurator, but this also applies to all Persistate applications if you expose the Save Workspace operation.
A Workspace created in this way is owned by the user that performed the operation, and stored in the Principal.Workspaces collection. You can examine them by displaying the Principals Form for the user, on which they appear as a sub-grid. You can rename them, set them as the start-up workspace and delete them on this grid.
Workspaces are entirely abstract, meaning that they work in exactly the same way with whatever type of UI is being used. There are no separate implementations of a Workspace required for each different UI type.
Working with Layouts
As opposed to Workspaces, there are two parts to working with Layouts. Firstly you create the Layout objects themselves, including their Placements and Formats. This is an entirely abstract process, and completely independent of the type of UI in which the Layouts will eventually be shown. The second part consists of generating concrete code from the Layout for a particular type of UI.
Creating Layouts
Layouts are not defined in the application definition file itself. However, Persistate Generator does help you to create Layouts, and provides two ways of doing this. Firstly, you can execute the Generate default layouts operation. This operation examines the classes in the package and on the basis of how the classes are used, for example within collections, it creates one or more Layouts for each class. There is also an option in the dialogue for the Process definitions operation to execute this operation. See Generator only operations for more details.
The Generate default layouts operation is usually a one time operation - you execute this to get started, but normally thereafter you normally use the second way - creating Layouts one at a time manually. To do this, in Generator, expand nodes on the left to navigate down through the Environment, Product package, and Persistent class collections to the class you want to create a Layout for, and then expand that and click Layouts to show the Layout Grid. In the Layout Grid, execute the New operation.
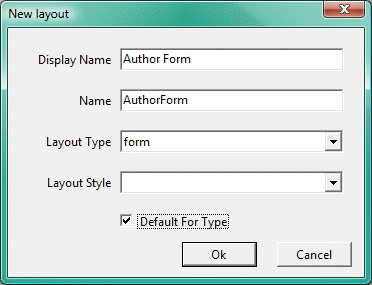
Creating a new layout
Give the new Layout a Display Name and choose the LayoutType you want to create in Layout Type combo. See above for the various types available. Unless you have good reason for doing so, leave the Layout Style blank. Set the Default For Type checkbox if you want this to be the Layout chosen when one is not specified and one of this type is required. Click Ok and the new Layout appears in the grid. Click Show on that row to display the Layout Form.
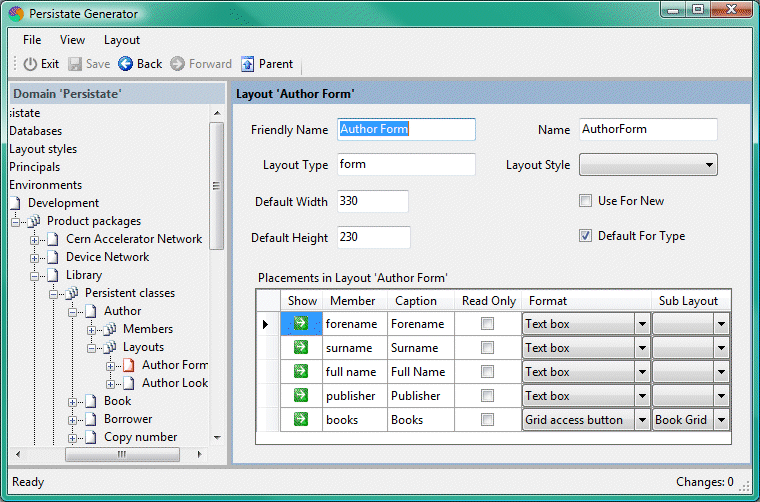
The newly created layout
You can also use this form to modify the Layouts created by the Generate default layouts operation. The Layout shown above, as generated, contains four text boxes and a button. If the user clicks the button, the Author.Books collection will be displayed using the Layout Book Grid. You can change a number of things on the Layout. You can change the Captions for the Placements, and you can make them Read Only. Importantly, you can choose the Format you want for each Placement. For example, you could select Sub grid instead of Grid access button. The Book Grid would then appear as a grid within the Author Form.
If you change a class, for example by adding or removing members, then you should make the necessary updates to the Layouts belonging to that class. To do this, in the Layout Form, execute the Update Placements operation, either on the Layout menu, or by right clicking the background of the form. (If you right click in the Placements Grid, you won't see this operation, as it is targets Layouts, not Placements.) This will make sure that each member of the class has a Placement. When you have made all the changes that you want, you are ready for the second part - generating code.
|
The current version of Persistate allows only one Placement per Member. A future version of Persistate will allow you to create more than one. |
Generating UI code
|
As stated above, there is only one type of UI available for now - a Windows Forms based Desktop UI. This section is therefore provisional and deals with only that UI type. |
Generating code for a Layout is easy. Simply execute the Generate Class operation, either on the Layout menu, or by right clicking the background of the form. When you do this, Persistate reads any existing class, and ensures that any changes you have made to the class, such as property values or even any extra controls you have added manually, are not overwritten. The class generated will be derived from PContainer, itself derived from UserControl. There is API documentation available for PContainer, though for simple applications, you shouldn't need to consult this.
Here is a screenshot of the Library application showing the Author Form as generated from the Layout shown above. It is showing some nonsense test data.
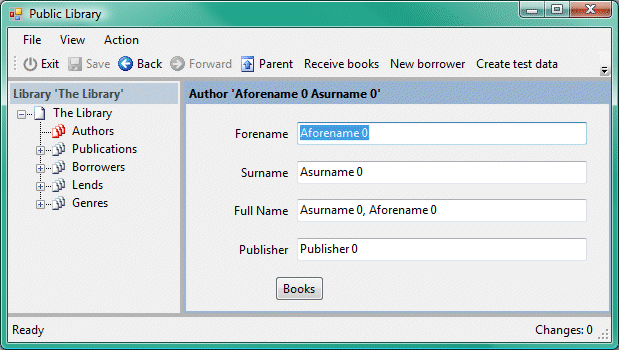
The default Author form
Once a class has been generated, you can edit it in a development environment, for example using the visual form editor in Visual Studio. The generated class has the name of the Layout, converted to Pascal case, so the Author Form class will be called AuthorForm. You can move controls around, and change properties. Here is a screenshot showing the same form, where the controls have been moved around, and the CaptionPosition property of the Full Name and Publisher text boxes have been set to above.
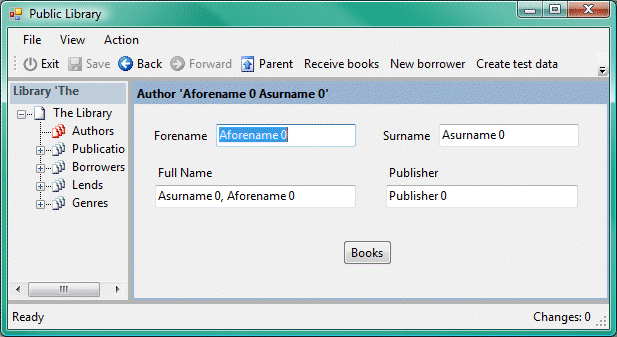
The Author form after moves and property changes
If you now decide you do want to show the Book Grid in this form, instead of a button, then, back in Generator, change the selected Format for the books member to Sub grid. Now execute the Generate Class operation again. In the IDE, edit the AuthorForm class. One thing you will notice is that the grid, which has replaced the button, nevertheless has the same size as the original button, in keeping with the policy of retaining property values in generated code. Here is a screenshot of the form with the grid resized to a reasonable size.
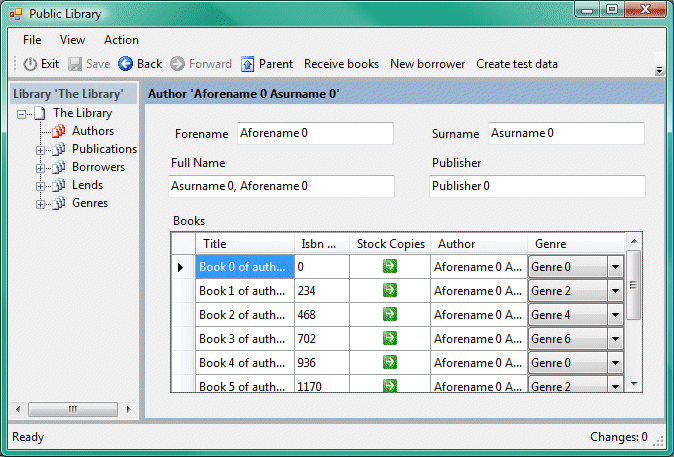
The Author form now with the book grid
That's essentially all there is to developing Layouts for the user interface. The generated classes will be displayed, as in the screenshots above, as the user navigates around the generated application, and you don't need to do anything further to have a fully working application. However, you can also control the UI completely from the Controller, showing forms in Panes as above, or in modal dialogue boxes. See Accessing the user interface for a description of how to achieve this.