Creating and running the Device Network demonstration
Creating and running the Device Network demonstration
Feedback on: Persistate - Creating and running the Device Network demonstrationCreating_and_running_the_DevicWalkthroughs > Creating and running the Device Network demonstration /My issue with this is:
Creating and running the Device Network demonstration
This walkthrough takes you through the creation, customisation and running of the Device Network demonstration application. Before using this walkthrough, you must have installed the Persistate Generator add-in for Visual Studio on your computer, and created a root database. The Installing the Persistate Generator add-in for Visual Studio walkthrough explains in detail how to do this.
The Device Network application models a collection of devices, each of which has a number of connectors. There is also a collection of cables, which can be plugged into the connectors. This can be used to model a simple device network, such as a home office with devices such as computers, peripherals, routers, etc.. It can also be used to model more complicated networks such as those found in data centres, or collections of industrial or scientific equipment.
1.
Download the DeviceNetwork.per file from the Downloads page and store it in a scratch folder. This is the Persistate definition file for the application, and describes the persistent data that the application is built around. It is a simple text file which describes the data in an intuitive but formal English like format. Have a look through the file - you should find it easy enough to understand most of what's going on in it. For more information about definition files, see Writing definition files.
2.
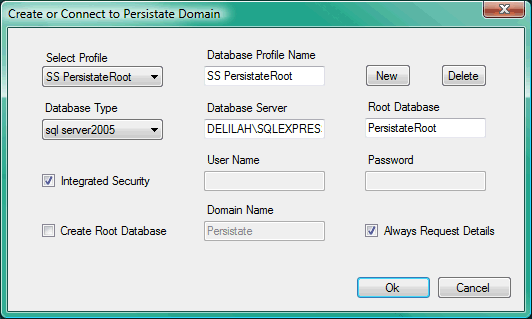
Start Visual Studio, with no solution loaded, and start Persistate Generator from the Tools menu. If theCreate or Connect to Persistate Domain dialogue box appears, select the profile you want (the last used will be selected automatically) and click Ok. The Persistate Generator window should appear. The 'Development' environment should be displayed in the right hand pane. If not, expand the Environments node in the left hand pane and click on Development to display it.
3.
Select the Create Package operation. This operation works on target Environment objects, so you select it with a pane containing an environment highlighted. This displays the Enter parameters for new Package dialogue box. You can select the operation by either:
•
Right clicking the pane background and selecting Create Package.
•
Selecting Create Package from the Environment menu. This menu appears only when an environment is the 'active' object in the user interface.
•
Right clicking in the (empty) Product Packages grid and selecting New.
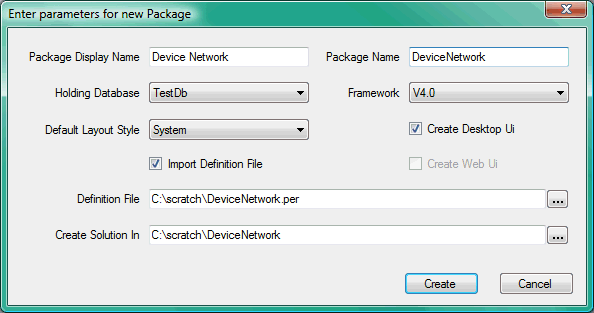
Creating the DeviceNetwork package
4.
Enter the details as shown above, substituting your own file paths and selecting the database you created when installing Persistate. Stick with the default .Net framework version - it will be 4.0, 3.5 and 2.0 for Visual Studio 2010, 2008 and 2005 respectively. It is recommended you stick with the System layout style for now. Click Create. Persistate now creates a solution for the DeviceNetwork package. The created solution contains four projects - one each for the Model, User Interface (View) and Controller aspects of the package, and a fourth Start-up project used only when the package is run in stand-alone mode. In the Persistate window, the right hand pane should now show the 'Device Network' package.
5.
This created solution is still more or less empty. To generate the full application you need to process the definition file. We will do this in two stages. In the first stage we will create the Model and Controller files, and generate the default layouts for the user interface. To do this, right click in the package pane background (or select the Package menu) and select Process Definitions.
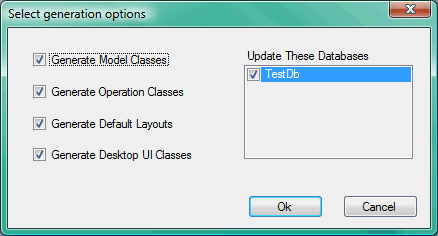
Processing definitions for DeviceNetwork
6.
Enter the options as shown above. Don't generate the UI classes for now, as we will be making some adjustments to the generated default layouts before doing this. If you are wondering why the dialogue mentions 'Operation' rather than 'Controller' classes, it is because although operations are (usually) executed in the controller, Persistate also generates code for them in the user interface which controls their visibility and enabled states. Click Ok. There is a confirmation dialogue box to click through before Persistate generates all the requested classes and objects, and also the tables and other items in the database. You may wish to have a look in the database with your DBMS admin program to see what has been created.
7.
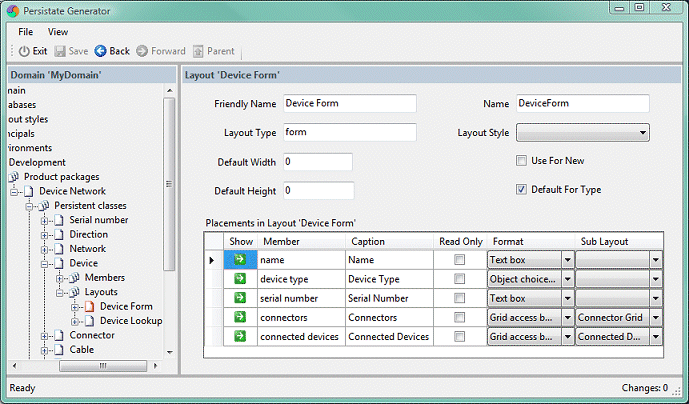
In the Persistate Generator window, in the domain tree in the left hand pane, you can now drill down through the Environments node, then Development, Product Packages, Device Network and Persistent Classes. This latter shows all the classes generated by Persistate from the definition file. If you drill down further, you will see that some of them have Layouts underneath. Drill down to Device, then Layouts, then click on the Device Form node. This puts up the form showing the Device Form object in the right hand pane.
Customising the Device Form
8.
Layout objects belong to ObjectClass objects and define how instances of the class are portrayed in a user interface. The Device class has two collections - its Connectors and Connected Devices. By default, the default form layout generated has 'grid access buttons' for these collections. These are buttons on the form which, when clicked, show the collection in a separate grid. Instead, we can show collections in 'sub-grids' in the form itself. To do this, change the Format for the Connectors and Connected Devices collections to Sub grid. Click the Save button in the toolbar.
9.
Similarly, drill down to the following layouts and make the changes mentioned
•
In the Cable layout Cable Form, change the Plugged Into format to a Sub grid.
•
In the Connected Device layout Connected Device Grid, change the Device format to Form access column, the DeviceSub Layout to Device Form, and its Caption to "Go". This will create a column in the grid with a button which will display the connected device in a Device Form.
10.
Now we will create a layout for the Cable class which was not generated by default.
•
In the Domain tree in the left hand pane, click the Layouts node under the Cable node. This should display a grid showing the Cable Form and the Cable Lookup.
•
Click the New toolbar button, or right click in the grid and select New. This will put up a dialogue to enter details of the new layout.
•
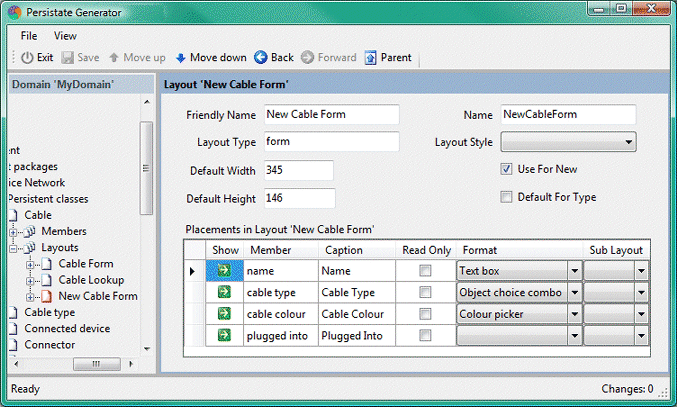
Enter 'New Cable Form' for the Display Name and select 'form' for the Layout Type. Click Ok. The new layout appears in the grid.
•
Click the Show button for the new layout, which will show it in the right hand pane.
•
Set the Use For New checkbox, and change the Format and Sub Layout for Plugged Into to blank, as show below. This defines a form with just three elements which will be used when creating new Cable objects.
The completed New Cable Form layout
11.
In a similar way, create a form for use when creating new devices.
•
Select the Layouts node under Device in the left hand pane, and in the displayed grid select the New operation.
•
Set the Display Name to "New Device Form" and select 'form' for the Layout Type. Click Ok. The new layout appears in the grid.
•
Click the Show button for the new layout, which will show it in the right hand pane.
•
Set the Use For New checkbox, clear the Format and Sub Layout for Connected Devices, and change the Format for Connectors to a Sub grid. The reason for making this form is that the connected devices grid can never contain any information when the device is just being created.
12.
Now we are ready to generate all the user interface classes for the defined layouts. To do this, in the Domain tree, go back up and click the node for the Device Network package. Once again, select the Process Definitions operation from either the Package menu or the right click context menu. This time check only the Generate Desktop UI Classes checkbox, and click Ok. After you click through the confirmation dialogue, Persistate generates all the UI classes in the DeviceNetwork.Desktop project.
13.
All the classes have now been generated, so now you can build the solution in Visual Studio. It should build without errors. Run the application. TheCreate or Connect to Persistate Domain dialogue box will appear (unless you have previously cleared the Always Request Details checkbox). The details should be the same as those you set when you created the root database, except that the Create Root Database checkbox should now be cleared. Click Ok.
Starting the application for the first time
14.
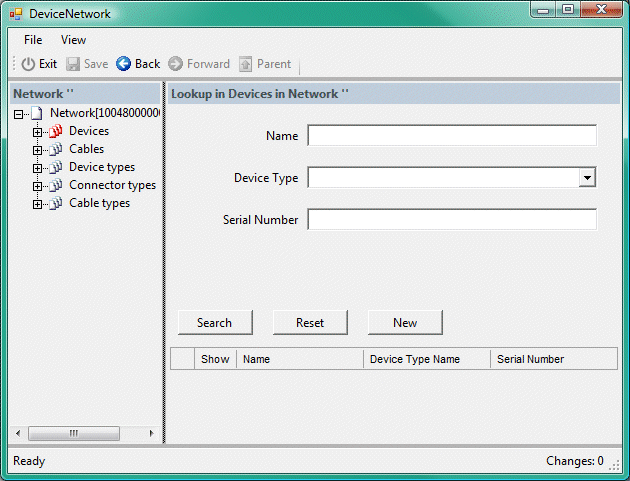
The application appears. Click on the various nodes in the tree on the left. Compare what you see with the definition of the Network class in the DeviceNetwork.per definition file. For Device Types, Connector Types and Cable Types, the application displays a simple grid on the right hand pane. For Devices and Cables, however, it displays a lookup form as shown below. This reflects the difference between a collection of several objects, which are all shown together in a grid, and a collection of many objects, where you have to find objects using a lookup form.
The new application showing a lookup form
15.
Create some device types. Click on the Device types node to display the grid, then to execute the New operation, either click the New button in the toolbar, right click in the grid and select New, or type CTRL+N. If you want to model the device network in your home office, you could create device types of Computer, Laptop, Router, Keyboard, Mouse, Monitor, Printer, etc. Execute the New operation once for every device type you want to create. Similarly, create some connector types, for example USB, D-SUB, RJ45, 3.5mm, AC In, DC In, Captive. Finally some cable types, such as Video, Power, USB, Audio, Cat 5.
As you create objects, you will note the Changes count on the right of the toolbar change. This figure reflects the number of changes which are waiting to be written to the database, and includes new, deleted and modified objects as well as additions and removals to and from collections. Whenever you make simple changes to objects in the UI, this figure will reflect your changes. However, when you execute an operation such as New, any changes you made are persisted before the operation is executed. You can also save the changes manually using the Save operation, or undo them using the Revert operation, both on the File menu.
•
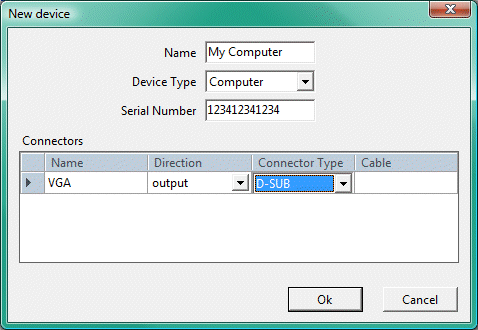
Now create a device. Click on the Devices node to display the device lookup form and click the New button on that form. A New device form appears in a dialogue box This form was generated from the New Device Form layout you created in step 11. The box by default will be rather wide, but you can drag the edges to change its size. Note how the contents resize and reposition as you do so. Enter details of the new device. You can also create new Connectors for the device at this point, by right clicking in the grid and selecting New. Once done, click Ok. The newly created device is then displayed in the right hand pane, using the default Device Form layout, which includes the Connected Devices grid The screenshot below shows a New Device Form with some details completed.
Entering details of a new device
16.
At this point, you may have noticed that the arrangement of elements in the automatically generated forms could perhaps be improved. You can do this using the Visual Studio forms designer in the usual way. Quit the application, and put up the DeviceForm.cs form from the Solution Explorer. The elements on the form are all Persistate controls such as PTextBox and PComboBox. These provide binding to the model classes, run time styling and various other enhancements. Notice that when you drag an element around, its caption follows. There are various properties to control the caption in the Appearance section of the properties grid. Clean up the arrangement of elements on the device form. For example, the two grids could be the same with, and two of the other controls could be alongside each other. Try to keep controls equidistant from each other, as this means they will reposition better as you resize the panes they appear in. Do the same for the other generated forms, as you wish. If you want to change a caption, it is best to do it in the layout, using Persistate.
There is a known problem with generated lookup forms, in this case CableLookup.cs and DeviceLookup.cs. As generated, the buttons and results grid are not necessarily set at the correct position, and may obscure other elements. You can work round this simply by putting the forms up in the visual designer and adjusting the form height as necessary. This problem is under investigation.
Even after changing a form using the Visual Studio designer, you can still regenerate it using Persistate. Do this, for example, if you have added a new member to a class, and want to show it in a form, or if you want to change the format for a member. You can even add non generated elements to a form, and Persistate will retain them through the regeneration process. Persistate also remembers the location and size of controls and any other property modifications you make in the Visual Studio property grid. If you remove a member from a class, however, you must remove any corresponding control manually.
17.
Build and run the application again. You will be able to see the effect your clean up of the forms has had. Create a few more devices, and using a similar technique, create a few cables also. For the moment, do not try to populate the Plugged Into grid on the Cable Form - we have a bit of coding to do before we start connecting up our network. At this point, you can also see how the device and cable lookup forms work. Experiment by entering terms into the search boxes. The text box terms match exactly unless you use the % wildcard character. (This may change in the future.) If you leave all the boxes blank and click Search, you get all objects in the collection. Quit the application when you're finished.
18.
If you look at the DeviceNetwork.per definition file, you will see that each connector has an associated cable, and that each cable has an associated collection of connectors that it's plugged into. This breaks one of the fundamental rules of database design in that it's not fully normalised - there is redundant or duplicated information. However, it is often useful to have a situation like this, for both ease of data access, and for performance reasons. Assuming that we want to keep this situation, Persistate provides a way of ensuring that the redundant information never gets out of step, and that uses data events. Open the Cable.cs class from the DeviceNetwork.Model project and add the following code.
/// <summary> /// Set up event handling /// </summary> publicstaticvoidSetEventHandlers(){ Cable.ItsObjectClass.InstanceAssociated +=newLinkageEventHandler(Cable_InstanceAssociated); Cable.ItsObjectClass.InstanceDissociated +=newLinkageEventHandler(Cable_InstanceDissociated); } // when cable associated to connector, add connector to cable's plugged into collection privatestaticvoidCable_InstanceAssociated(objectsender,LinkageEventArgsargs){ Connectorconnector=args.ContainerasConnector; if(connector!=null) ((Cable)args.Containee).PluggedInto.AddIfAbsent(connector); } // when cable dissociated from connector, remove connector from cable's plugged into collection privatestaticvoidCable_InstanceDissociated(objectsender,LinkageEventArgsargs){ Connectorconnector=args.ContainerasConnector; if(connector!=null) ((Cable)args.Containee).PluggedInto.Remove(connector); }
19.
The InstanceAssociated event occurs whenever an object is added to an associated collection, or set as a single associated member. In this case above, whenever a Cable is associated to another object, the event fires. This happens whenever the Cable property of the Connector class is set with a Cable value. When this happens, the Cable_InstanceAssociated method is called, and the connector in question is added to the cable's PluggedInto collection. Similarly, when a cable is dissociated from a connector, the connector is removed from the cables PluggedInto collection. This happens whenever you overwrite the Cable property with null, or another Cable object. In the latter case, both the InstanceDissociated and InstanceAssociated events fire. But what about the other way round? Open the Connector.cs class and add the following code.
/// <summary> /// Set up event handling /// </summary> publicstaticvoidSetEventHandlers() { Connector.ItsObjectClass.InstanceAssociated +=newLinkageEventHandler(Connector_InstanceAssociated); Connector.ItsObjectClass.InstanceDissociated +=newLinkageEventHandler(Connector_InstanceDissociated); } // when connector added to cable's plugged in collection, associate cable to connector privatestaticvoidConnector_InstanceAssociated(objectsender,LinkageEventArgsargs){ Cablecable=args.ContainerasCable; if(cable!=null) ((Connector)args.Containee).Cable=cable; } // when connector removed from cable's plugged in collection, dissociate cable from connector privatestaticvoidConnector_InstanceDissociated(objectsender,LinkageEventArgsargs){ Cablecable=args.ContainerasCable; if(cable!=null) ((Connector)args.Containee).Cable=null; }
20.
This performs a very similar function to the code in Cable.cs above, except that the Connector.Cable property is set whenever the connector is added or removed from the Cable.PluggedInto collection. An obvious worry here is that this could go round and round, with each association triggering the other. This won't happen for two reasons. Firstly, the AddIfAbsent method doesn't raise the event if the object was already in the collection, and secondly if you set a scalar property to the same value it already has, again no event is raised. You now have to make sure these events are subscribed. The best place to do this is in the Controller project's InitialiseController class in the InitController method. This method is called both from the StartUp project's StartUp class, and by the Persistate Server when it starts a new DeviceNetwork session. Add the following code.
// Set up event handlers Cable.SetEventHandlers(); Connector.SetEventHandlers();
21.
Build and run the application. Now you can start plugging in cables. So that you can see the event handlers in action, it would be good to see all the objects affected, and to do that we need to split the right hand pane. Do this as follows.
•
Click in the empty right hand pane to select it then choose Add Pane/To right from the View menu.
•
Then in turn for both the empty panes, select them and choose Add Pane/Below. You should now have four empty panes.
•
Expand the window, and drag the pane edges to make all the panes roughly the same size.
•
Click the Devices node in the left hand pane. In the lookup form, click Search, which should show all your devices in the results grid.
•
Click the Show column for both the devices you want to plug a cable into - say a computer and a router. Their forms should appear in two of the blank panes.
•
Right click in the lookup form title bar (where it says 'Lookup devices in Network' and select Clear Pane.
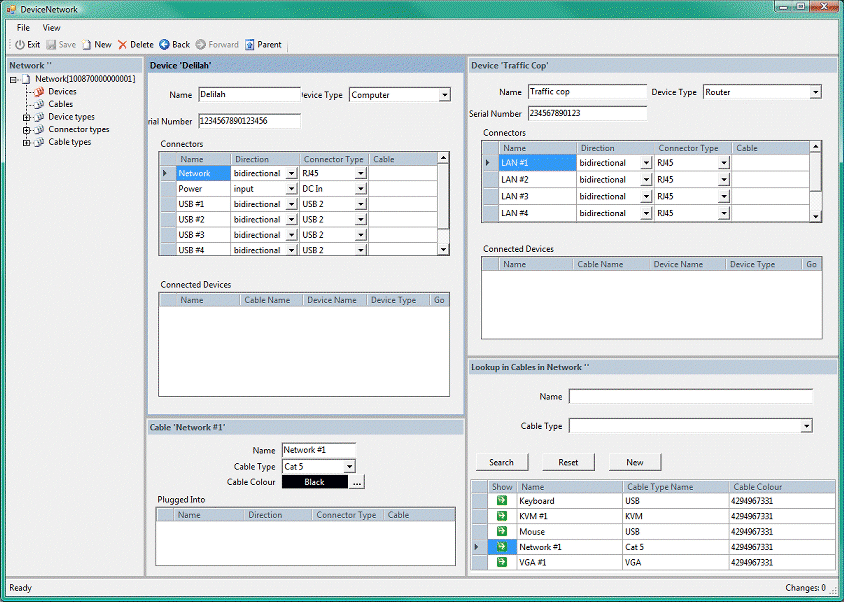
•
Click the Cables node in the left hand pane. In the lookup form, click Search and then click Show for the cable you want to plug into the two devices you selected. The window should now look something like the following (the various forms may be in different panes).
Ready to plug in a cable
22.
To plug in a cable, right click in the Plugged Into grid in the cable form and select Add. This puts up the object selection dialogue, which allows you to browse through the persistent tree, selecting the objects you want to add to the collection. It shows a tree in its left hand pane, with Network at the top. To select the connectors you want in the dialogue box, perform the following
•
Click on the Devices node, which puts up a device lookup.
•
In the device lookup, click Search. (If the collection contains a large number of devices, you can specify search terms.)
•
In the result list, find and set the Selected checkboxes for both the devices you want to plug the cable into. Click the Select button on the lookup form. (not the Ok button!) The selected devices now appear in the tree on the left.
•
Expand the node for the first device and click on the Connectors node. In the Selectable Objects pane, select the connector you want and click Select to copy it to the Selected Objects pane.
•
Repeat the previous step for the second device. Both connectors should now be in the Selected Objects list.
•
Click Ok.
23.
The Plugged In grid should now be populated with the chosen connectors, and in the two device forms, you should see that, thanks to the event handlers, the Cable column in the connector grids should show the cable name for the appropriate connectors. Repeat the previous step to plug in further cables. You are not limited to two connectors per cable - some cables have more than 2 end-points, for example KVM switch cables. Try removing a connector from a Plugged In grid by right clicking and selecting Remove. You should see the cable name disappear from the connector grid on the appropriate device. You can use Add to add it back in.
24.
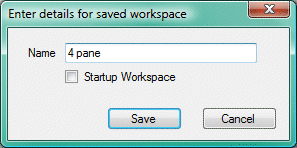
Before continuing, the four pane arrangement we have now is useful. We can save this for alter use. To do this select Save Workspace from the View menu. In the displayed dialogue, enter a name for the workspace and click Ok. This remembers the contents of each pane as well as their physical arrangement.
Saving the workspace for later
25.
Although we now have plugged in cables, you will have noticed that the Connected Devices grids on the device forms are still empty. This is because these grids are bound to a collection defined by selected connected devices in the definition file. The selected term means that the collection is based on a view class. These collections are not automatically populated - you must query them manually. The best place to do this in the SetBindings method. This method is called by the Persistate run-time to bind a generated form to a persistent object. We can override this in the DeviceForm class to do what we need. Add the following method to this class. You will also need to add a using DeviceNetwork.Model statement.
/// <summary> /// Populates the ConnectedDevices grid when the form is bound. /// </summary> /// <param name="parent">The containing PContainer or null.</param> publicoverridevoidSetBindings(IPContainerparent) { // Do it only when form is being bound to an assigned (persistent) device Devicedevice=DataSourceasDevice; if(device!=null&&device.IsPersisted) device.SelectConnectedDevices(device); base.SetBindings(parent); }
26.
Build and run the application. Click on the Devices node in the left hand pane, and Show a device. The Connected Devices grid will now be populated. Furthermore, you can now zoom along a cable to a connected device by clicking the Go column for that device. You can browse your device network easily from device to device. Our application is now nearly complete. The only thing left to do is to implement the operations defined for the device and cable classes.
27.
You will see that in the definition file there is an operation called Disconnect in an operation group called Device in the device class. Operation groups are used to group operations in the user interface, for example into menus. Persistate will have generated two methods for the Disconnect operation. Here we are concerned only with the ExecuteDisconnect method generated in the DeviceOperations class in the controller project. This operation will simply disconnect all cables from a device. Alter this method with the following code.
publicstaticExecutionResultExecuteDisconnect(Executionexecution) { // get device to disconnect. Should never be null, but just in case... Devicedevice=execution.TargetasDevice; if(device==null) returnExecutionResult.NoActionResult; // first ask user for confirmation UserInterfaceui=execution.UI; if(!ui.UserConfirms("Do you really want to disconnect all cables from {0}",device)) returnExecutionResult.NoActionResult; // set cable in all connectors to null foreach(Connectorconnectorindevice.Connectors){ connector.Cable=null; } returnExecutionResult.CommitResult;// commits changes to persistent storage }
28.
The other defined operation is the Unplug operation in the cable class. You will find the ExecuteUnplug method in the CableOperations class in the controller project. This operation will unplug the cable from all connectors it is currently plugged into. Alter this method with the following code.
publicstaticExecutionResultExecuteUnplug(Executionexecution) { // get cable to unplug. Should never be null, but just in case... Cablecable=execution.TargetasCable; if(cable==null) returnExecutionResult.NoActionResult; // first ask user for confirmation UserInterfaceui=execution.UI; if(!ui.UserConfirms("Do you really want to unplug {0} from all connectors?",cable)) returnExecutionResult.NoActionResult; // simply remove all connectors from cable's connector collection cable.PluggedInto.RemoveAll();// don't use Clear - it doesn't affect persistent storage returnExecutionResult.CommitResult;// commits changes to persistent storage }
29.
Build and run the application. Now you can restore the workspace you saved earlier. Select Restore Workspace from the View menu, select the workspace from the list and click Ok. Now in a device form, either right click in the form background and select Disconnect, or select it from the Device menu. The change should be reflected in the Plugged Into grids of the cable form for disconnected cables. You will notice that the device's Connected Devices grid is not updated. This is expected, and fixing it is left as an exercise for the reader (see below).
30.
To execute the Unplug operation, put up a cable form showing a cable plugged into some devices. Right click in the form background and select Unplug, or select Unplug from the Cable menu. Again, if you have any connected device forms visible, then the Cable column for the connectors concerned should go blank.
31.
Finally, you can create a deployable file for the application. To do this, in Persistate Generator, click on the node for the Device Network package to display the package form. Then right click the form background and select Deploy. Note that this option will be available only if you have the DeviceNetwork solution loaded into Visual Studio. This creates a file called DeviceNetwork_Deploy.ser in the solution folder. You can use this file to import the application into a Persistate Server. See Installing and running the Persistate Server for details of how to set up a server.
32.
That's the end of this walkthrough, but our small application is far from perfect. Here are a couple of examples of improvements that could be made. These are left as exercises for the reader, but you can also download a solution with these implemented from the Downloads page.
•
The Connector Grid on the cable form shows the connectors that the cable is plugged into. The grid is fine when used on the device form, but here it could stand improvement. There is no need for the Cable column, as it is always the cable that you're viewing. Also, there is no indication of which device the connector belongs to, and no way to show the form for that device. To fix this, create a new connector grid for use only on the cable form. You will need to create the necessary properties by adding a device_ name = "ParentDevice.Name" and a go device = "ParentDevice" to the connector class in the definition file. For the latter, use a FormAccessColumn format. After doing, that you must process definitions, creating source code so that the necessary properties are generated.
•
The Connected Devices grid is populated when the device form is bound, but if you then plug or unplug a cable while the form is displayed, it is not updated. Fixing this will not take much code but could be tricky. You would have to call SelectConnectedDevicesafter any changes were committed to persistent storage, since the view class queries the database directly. Your best bet would be to use the event handlers introduced above to remember devices whose grids need refreshing, and then to use the Session.Committed event to invoke the view class. Remember also you have to update grids for devices on all end-points of a cable when you unplug one end!